


KubeArmor Policy Deployment in a Sample Workload
Introduction KubeArmor allows applying policy settings at the level of network system calls, controlling interactions among containers What you will learn: Deploy KubeArmor on Google Kubernetes Engine (GKE) Create a MultiUbuntu Microservice Deployment Apply KubeArmor Policy (ksp) to block the malicious app behavior Create a YAML policy to block (or use an existing one to […]
Reading Time: 4 minutes
Table of Contents
Share This
Introduction
KubeArmor allows applying policy settings at the level of network system calls, controlling interactions among containers
What you will learn:
- Deploy KubeArmor on Google Kubernetes Engine (GKE)
- Create a MultiUbuntu Microservice Deployment
- Apply KubeArmor Policy (ksp) to block the malicious app behavior
- Create a YAML policy to block (or use an existing one to apply) the action
- Check the logs for applied KubeArmor System Policy
What you will need:
A Google Cloud Platform project to create GKE Cluster
Setup and Requirements
If you’ve not deployed KubeArmor in your GKE already then worry not, just enter the following one command and it should be running well.
kubectl apply -f
https://raw.githubusercontent.com/kubearmor/KubeArmor/master/deployments/GKE/kubearmor.yaml
Command
Once deployed you can check the status of pods using the below command:
kubectl -n kube-system get pods -l kubearmor-app=kubearmor
Command 2
Create MultiUbuntu Microservice Deployment:
To deploy the sample microservice application we’ve combined all the deployment into a single YAML so all you need is to just apply the below command:
https://raw.githubusercontent.com/kubearmor/KubeArmor/master/examples/multiubuntu/multiubuntu-deployment.yaml
Command 3
You can see the deployment running successfully in multiubuntu namespace and can verify on your own cluster using the same command:
kubectl get pod -n multiubuntu
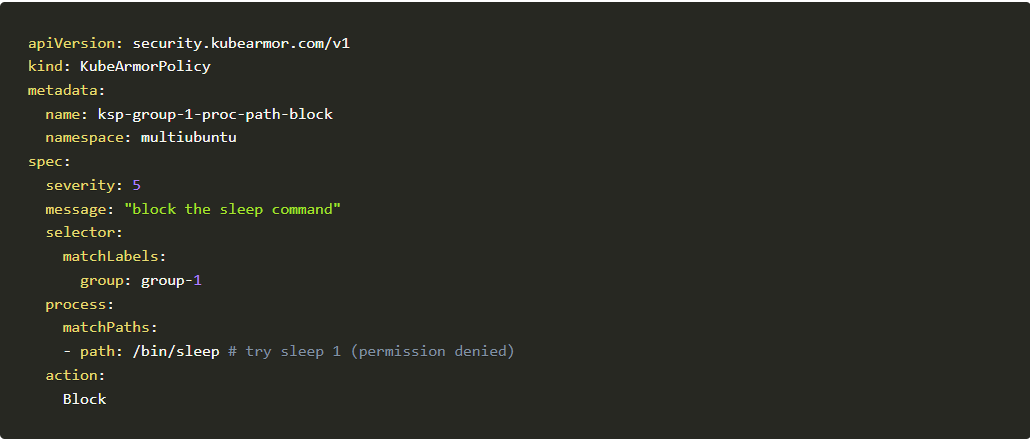
Example #01: Block process execution:
Let’s take the first example to block process execution in this case we’re trying to block sleep command. Below you can see the policy.
 Block process execution
Before going into that let’s compare the 2 given scenario and try to figure out the difference. Don’t worry we’ll also describe the difference in the last.
Scenario #01: Executing sleep 3 command without applying the above policy
We need to execute inside the pod into consideration which is ubuntu-1-deployment-random-string
kubectl exec
-it –namespace multiubuntu ubuntu-1-deployment-6d897796-pjv44 — bash root@ubuntu-1-deployment-6d897796-pjv44:/# sleep 3
Ubuntu deployment
Scenario #02: Now let’s apply the policy and see the difference in execution
 Github user content
Analysis: Comparing two scenarios we came to the conclusion that the above policy was able to block sleep command on ubuntu-1-deployment successfully.
Now the question is how I can get the logs, the source of truth if it was blocked or not?
But before that let’s look into one more example to understand more clearly.
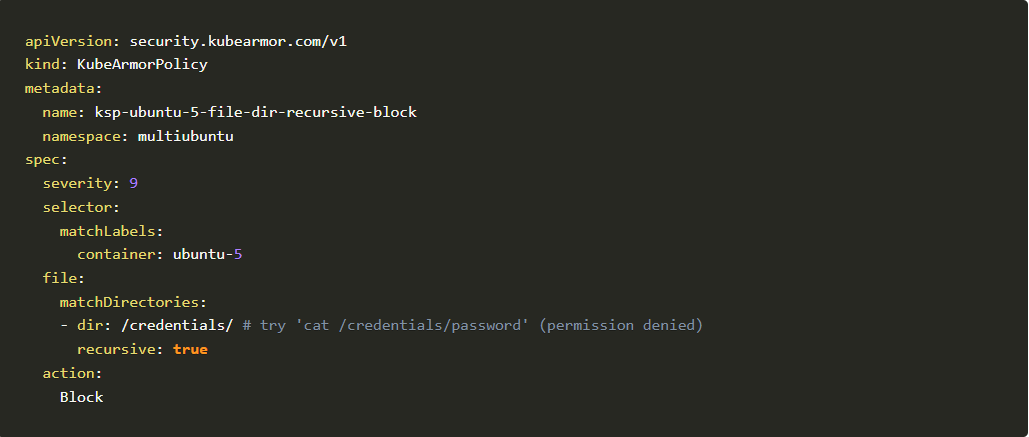
Example #01: Block file access:
Another example is to block a specific directory and the subdirectories which contain sensitive information and we wanted to protect it. So let’s see how it can be achieved. In this example, we’ll leverage the below policy to demonstrate file access restriction
Policy to demonstrate file access restriction
Let’s repeat the above scenario in ubuntu-5-deployment
 Ubuntu deployment
You should be able to see the sensitive file.
Now let’s repeat the same step but after applying the above policy.

Github user content 2
You can see Permission denied
Checking Audit Logs:
Now let’s get back to the point where we wanted to know how I can get into the logs what policies have been denied. Not only deny we can use other actions as well
Don’t forget to look into Security Policy Specification for Containers for KubeArmor Policy Specification
To check for audit logs, we need to find the common node where KubeArmor pod and our sample deployment pod is running
To do it first we need to find the node where MultiUbuntu pods are running
kubectl get pod -n multiubuntu -o wide
Take a note of node, it may vary in your scenario. We’ve highlighted it in red Now describe the node and make note of KubeArmor pod there, to make things clear I’m doing a grep on top of the command
kubectl describe node gke-accuknox-qa-e2e-accuknox-qa-e2e-p-8889bb4d-qmcn | grep kubearmor-
kubectl describe node gke-accuknox-qa-e2e-accuknox-qa-e2e-p-8889bb4d-qmcn |
grep kubearmor-
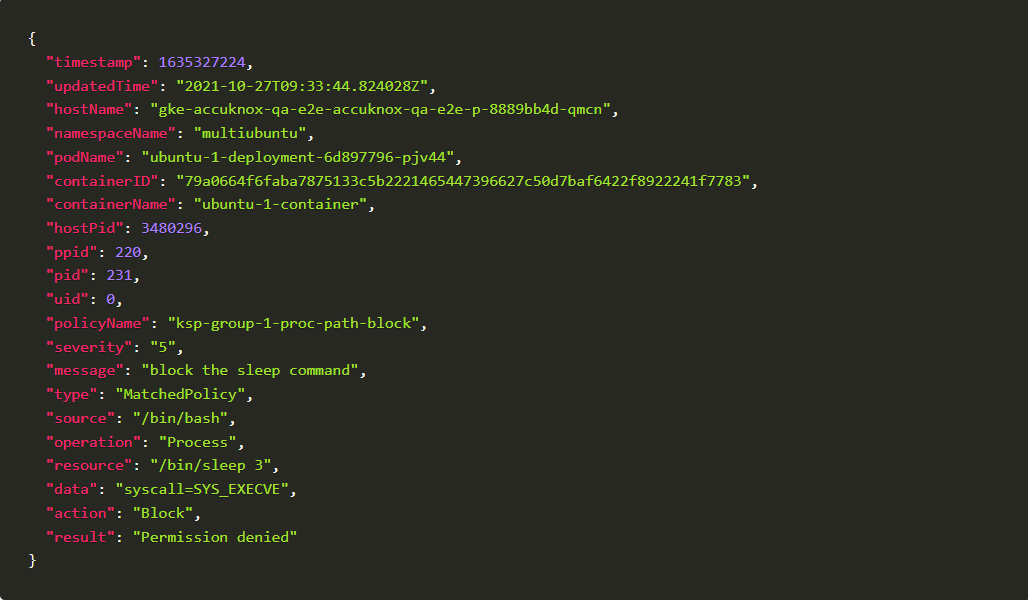
kubectl exec -it -n kube-system kubearmor-6nh7j — cat
/tmp/kubearmor.log
This is the sample KubeArmor log you will get:
 Kubearmor log
Conclusion:
- Got Questions, feel free to say Hi on Slack: Join the KubeArmor community on Slack!
- Want to contribute, check out community-driven policy templates: GitHub – Community curated list of System and Network policy templates for the KubeArmor and Cilium
Now you can protect your workloads in minutes using AccuKnox, it is available to protect your Kubernetes and other cloud workloads using Kernel Native Primitives such as AppArmor, SELinux, and eBPF.
Let us know if you are seeking additional guidance in planning your cloud security program.
Must read articles
- Zero Trust (ZT) – The Future of Cloud Security
- Zero Trust (ZT) Architecture, Framework and Model
- Cloud Security Governance, Risk and Compliance (GRC)
- How to Pick the Right CNAPP (Cloud Native Application Protection Platform) Vendor
- What is Driving the Need for CSPM (Cloud Security Posture Management)
- Agent vs Agentless Multi Cloud Security
You cannot secure what you cannot see.
Your most sensitive information is stored on cloud and on premise infrastructure. Protect what is most important from cyber attacks. Real-time autonomous protection for your network's edges.
