How to Troubleshoot KubeArmor policies?
How to troubleshoot KubeArmor policies in GKE In this blog, we are going to see how to troubleshoot KubeArmor policies in GKE. This blog assumes that you have read the concepts which explain all the components and fundamentals of KubeArmor. The blog will cover the following key steps: Creating policies Applying policies Testing policies Troubleshooting […]
Reading Time: 4 minutes
Table of Contents
How to troubleshoot KubeArmor policies in GKE
In this blog, we are going to see how to troubleshoot KubeArmor policies in GKE.
This blog assumes that you have read the concepts which explain all the components and fundamentals of KubeArmor. The blog will cover the following key steps:
- Creating policies
- Applying policies
- Testing policies
- Troubleshooting policies
Creating policies
- To deploy KubeArmor in GKE apply this script. Github KubeArmor <<Deployments yaml>>
- Another method is to deploy kubearmor in GKE follow this guide to deploy kubearmor in a very simple way.
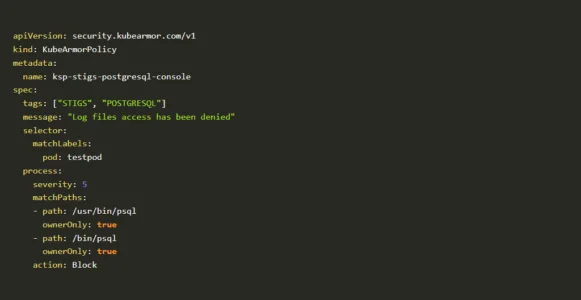
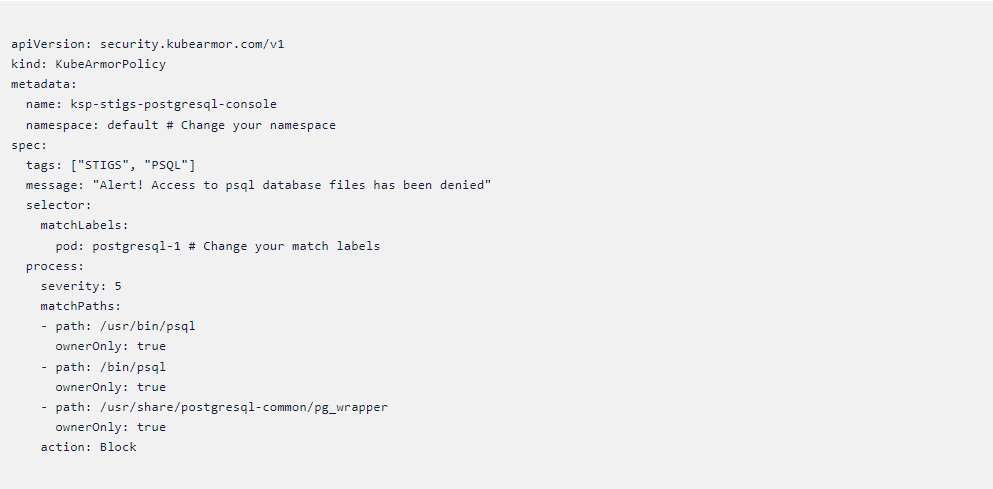
- Sample PostgreSQL policy is given below:
Sample PostgreSQL policy - The above policy has been created for the PostgreSQL workload. Psql is the binary for PostgreSQL. If anyone tries to access the psql the policy will deny the access. Those binaries will be found easily in the bin folder inside the Linux directory.
- Let’s apply the policy and see it in action!
Applying policies
- When applying policies make sure to verify with YAML lint applications to verify the structure and indentation of the YAML files. If
not verified, the policy will fail to apply.
Note: The policy must follow the required policy structure of KubeArmor. View here
KubeArmor structure
- The above error shows that you may have missed the YAML indentation. As shown below.
- The above error can simply be fixed by changing the indentation. Make sure to use appropriate YAML lint extensions in your code editor to avoid these kinds of errors.
- Now we have fixed the policy. Let’s try to apply that policy and see it in action.
[root@karmor]$ kubectl apply -f postgresql-policy.yaml
kubearmorpolicy.security.kubearmor.com/ksp-stigs-postgresql-console
created - Now our policy has been created and applied in the GKE.
- Check here for a complete guide and specification to write a kubearmor policy.
Testing policies
-
- When you are testing policies you have to check with KubeArmor Security policy specifications.
- Make sure the wordings are spelled correctly. Otherwise, it throws an error like this shown below. These types of errors are likely to happen when we misspell words. So make sure to check in with the contribution guide mentioned above.
Testing policy
- The above error shows we misspelled the words “matchPath” instead of “matchPaths” and followed by “matchLabel” instead of “matchLabels” also “tag” instead of “tags”. Let’s fix those errors and test the policy again
- This is the fixed policy with correct spellings.
Kubearmor policy
Code block
- Now our policy is applied and ready.
[root@kubearmor]$ kubectl apply -f postgres-policy.yaml
kubearmorpolicy.security.kubearmor.com/ksp-stigs-postgresql created - Let’s deploy PostgreSQL deployment in our cluster to test the policy.
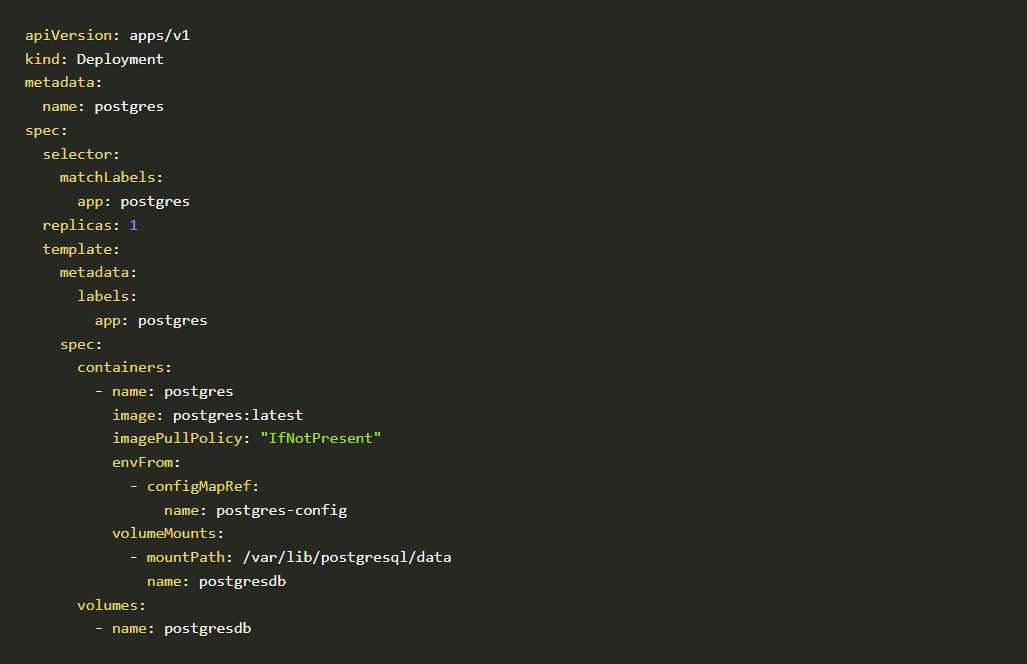
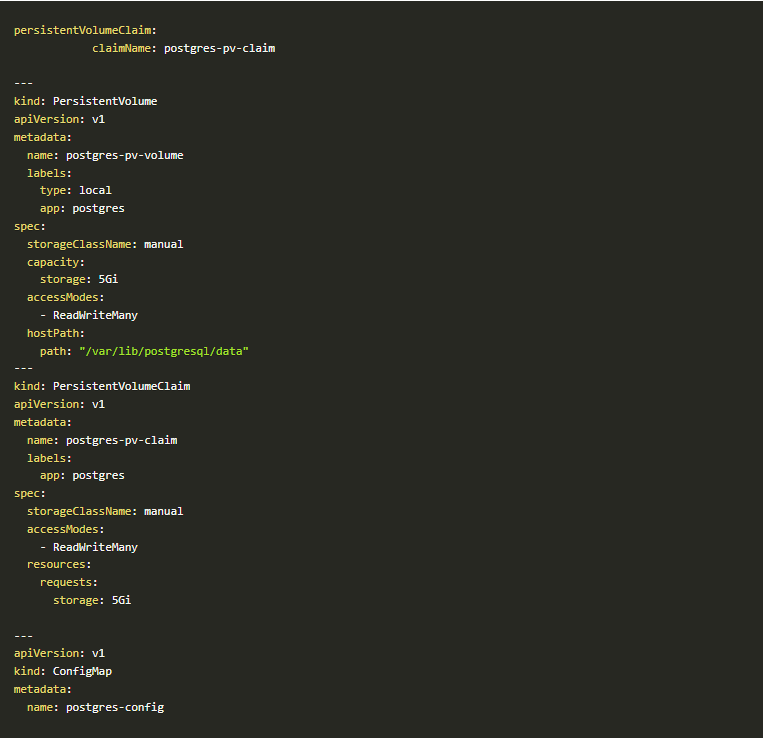
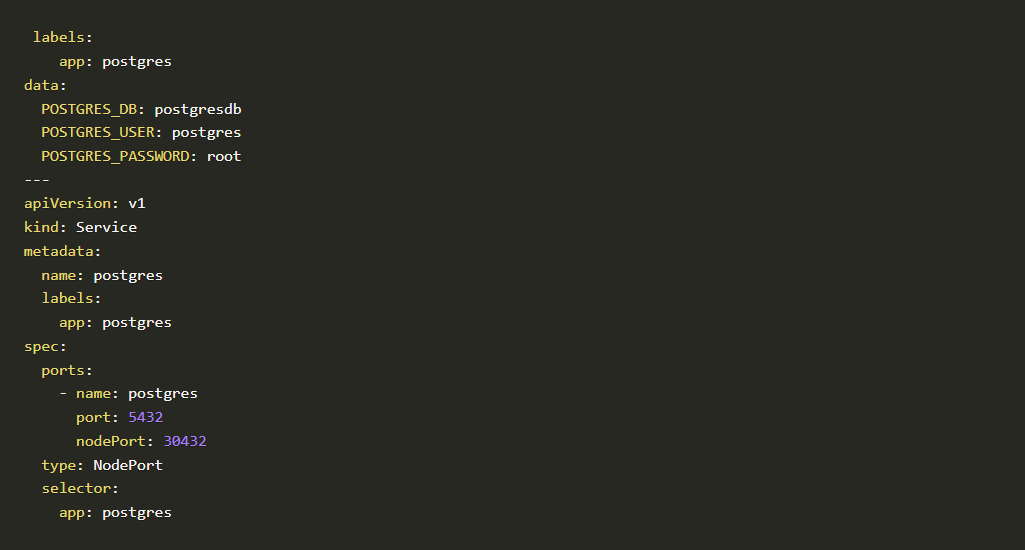
- To deploy a Postgres service in your cluster we have to apply this script
Script-1
Script-2
Script-3
- Now we have our working Postgres pod running in our k8s cluster.
Postgres pod
- Now let’s try to access the psql binary to test if it’s working or not. The goal is to block access to the psql binary.
psql binary
- As you can see in this above problem, psql binary is still accessible even after applying the policy. That policy is not working as we expected. Let’s troubleshoot where it went wrong and fix the policy.
Troubleshooting Policies
- Even after using the correct format and parameters, the policy is not working and psql binary is still accessible. Why?
- Let’s check the binary location with commands we know such as “whereis” and “which”. So we can figure out whether we added the correct path or not.
- Here we checked psql binary location “whereis” command It shows that we added the correct path in our policy but still the policy is not working as we expected.
- Let’s dive in deep and find if we have any other connections to the psql binary. If there is, we can add that to our policy.
Kubearmor pod
- Now when we check the psql with “ls -la” command. That psql binary is linked with “../share/postgresql-common/pg_wrapper”
- So now we can see that it’s linked with another binary. So that’s why it’s not blocking the psql binary. We can add that in our policy and test that again.
- Here’s the updated policy with that path included
Kubearmor policy
- Let’s apply this policy and check whether it is blocking the psql binary or not.
- Now our policy is created without any errors.
Policy template
- Now we have our working policy that can block the psql binary in postgres
pod. So we can authorize the use of the postgres server.
KubeArmor Logs
-
- To check kubearmor generated logs. We have to type this command to see that.
- kubectl -n kube-system get pods -A | grep kubearmor
- This command will list all kubearmor pods as shown below.
Kubearmor pods
- You have to select the first three pods that are named “kubearmor-1234” similarly. This name will differ in your environment. You have to enter the command shown below.
- kubectl -n kube-system exec -it <kube-armor-pod> — tail /tmp/kubearmor.log
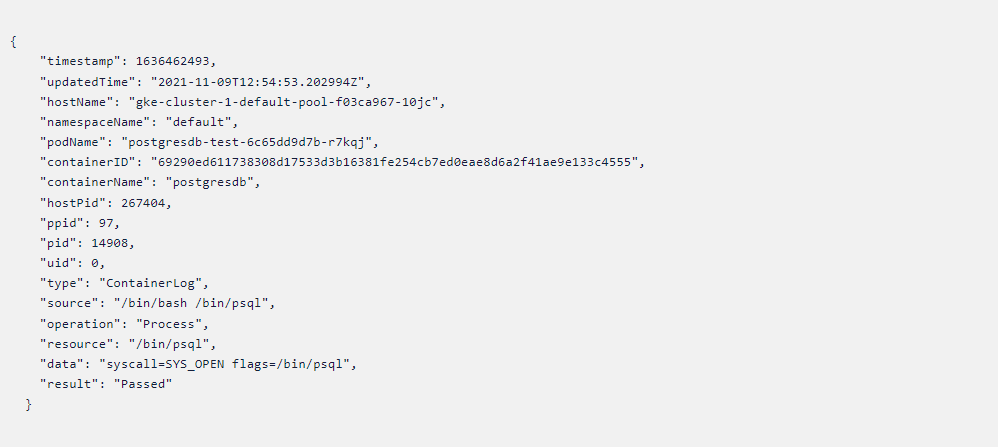
- You will see the logs like this in the terminal as shown in the image below
Kubearmor pod
- We can format that as “pretty JSON” using a website like https://jsonformatter.org/.
- Here is the generated command modified with JSON formatter.
Policy template
- The above logs will confirm that our policy is working as expected.
psql binary
- As you can see in this above problem, psql binary is still accessible even
after applying the policy. That policy is not working as we expected. Let’s
troubleshoot where it went wrong and fix the policy.
Must read articles
- Zero Trust (ZT) – The Future of Cloud Security
- Zero Trust (ZT) Architecture, Framework and Model
- Cloud Security Governance, Risk and Compliance (GRC)
- How to Pick the Right CNAPP (Cloud Native Application Protection Platform) Vendor
- What is Driving the Need for CSPM (Cloud Security Posture Management)
- Agent vs Agentless Multi Cloud Security
Zero Day Attacks cost $3.9M on average

4+
Marketplace Listings
7+
Regions
33+
Compliance Coverage
37+
Integrations Support

Stop attacks before they happen!
According to the latest IBM cloud attack report - Each cloud attack on an average costs $3.92M
Total Exposed Attacks in 2024 Costed

