How to troubleshoot Cilium Policy?
What is Cilium Policy In this blog, you will learn about what cilium policy is, we’ll check how the pod to pod connection works, which pod is able to access and which pod is denied, the problems you will face while creating a policy, and validating it and finally, we can check the logs. Let […]
Reading Time: 5 minutes
Table of Contents
What is Cilium Policy
In this blog, you will learn about what cilium policy is, we’ll check how the pod to pod connection works, which pod is able to access and which pod is denied, the problems you will face while creating a policy, and validating it and finally, we can check the logs. Let us understand what cilium can do.
- Securing container-based infrastructure
- Enabling visibility & controls
- The basis for network controls
What you will learn:
- Create and Apply a Cilium Policy
- Pod to pod connection
- Troubleshoot for the policy misconfiguration
- Check the logs for applied Cilium Policy
What you’ll need:
- A Google Cloud Platform project to create GKE Cluster
Example 1:
Let me show you how this policy works. Here I’ll create five multi ubuntu pods. The first pod is able to connect with the second pod and vice versa but if we use any other pod to connect with the first pod it will deny the connection. Let us see how we can restrict the connection between pods and the creation of pods.
First, let us deploy the 5 multi ubuntu pods, Just copy and paste the following command in your terminal.
kubectl apply -f
https://raw.githubusercontent.com/kubearmor/KubeArmor/main/examples/multiubuntu/multiubuntu-deployment.yaml
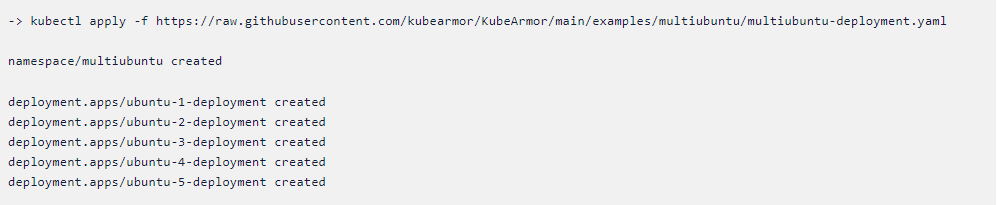
Below you can see the namespace multi ubuntu and 5 pods have been running successfully. You can check this in your terminal using the following command. [Note: pods may vary]
-> kubectl get pods -n multiubuntu

Below you can see the namespace multi ubuntu and 5 pods have been running successfully. You can check this in your terminal using the following command. [Note: pods may vary]
-> kubectl get pods -n multiubuntu

Now let us apply a rule to allow ubuntu-1 pod connection to the ubuntu-2
pod. Just copy and paste the following command in your terminal.
Kubectl apply -f
https://raw.githubusercontent.com/tamilmaran-7/cilium-example/main/pod-network-ingress-egress-allow.yaml
Let us see if the policy is created and running. Just copy and paste the
following command in your terminal.

To check if the policy works let us get inside the ubuntu-1 pod and we
will connect to the ubuntu-2 pod. Before that, we need to get the pod’s
internal IP. just copy and paste the following command in your
terminal.
kubectl get pods -n multiubuntu -o wide
Now let us get into the ubuntu -1 pod and then we will use telnet to
connect to the ubuntu-2 pod. just copy and paste the following
command in your terminal.
kubectl exec -it -n multiubuntu ubuntu-1-deployment-5d6b975744-njr57 —
bash
-> kubectl exec -it -n multiubuntu

Here you can see we are able to connect to the ubuntu-2 using its
internal IP. Let us get into the ubuntu-2 pod and connect to the ubuntu-1
pod using its internal IP. just copy and paste the following command
in your terminal.
kubectl exec -it -n multiubuntu ubuntu-2-deployment-6c464dc68-npsj2 — bash

Let us now get inside the ubuntu-3 pod and then we will connect the
ubuntu-1 pod. To do this just copy and paste the following command in your
terminal.
kubectl exec -it -n multiubuntu ubuntu-3-deployment-7cb8ff55fb-4r2w4 — bash

Here, the policy will deny the connection.
How to check logs?
Let us now retrieve the log files of a cilium pod. First, we’ll see how many
cilium pods are running. just copy and paste the following command in your
terminal.
kubectl -n kube-system get pods -l k8s-app=cilium

[Note: Cilium pods may vary]
Now let us get inside any one of the cilium pods and then we will use the
grep command to search for our log.
kubectl -n kube-system logs –timestamps cilium-2bwqv | grep
pod-network-ingress-egress-allow
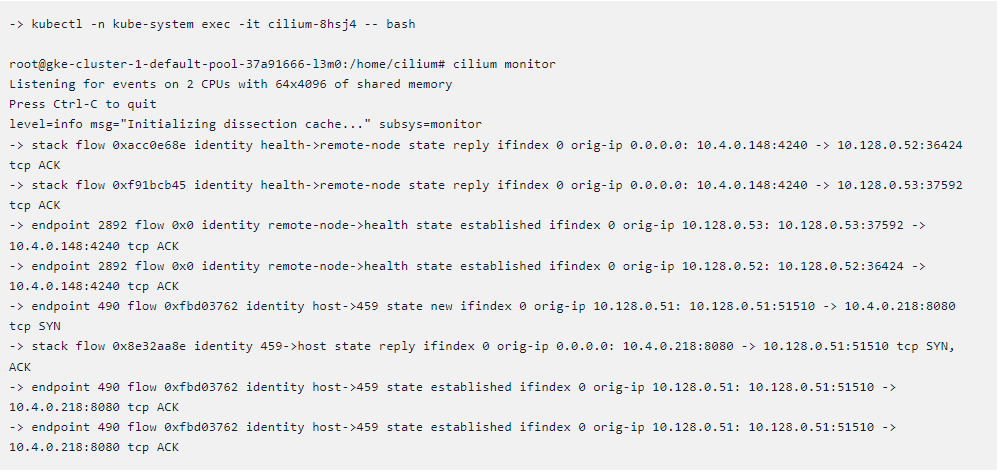
Cilium monitor in an inbuilt command that can be used to listen to events
in real-time. We will get inside the cilium pod and then we will run the
command. just copy and paste the following command in your terminal.
-> kubectl -n kube-system exec -it cilium-8hsj4 — bash
->root@gke-cluster-1-default-pool-37a91666-l3m0:/home/cilium#
cilium monitor
Let’s see how we can troubleshoot the policy if there is any
misconfiguration. Sometimes policy format is not that good and it won’t work
as expected there are certain things that should be followed while writing a
policy.
For example, let us take the policy we have applied and we will do some
small changes to it. Here is the link to the edited policy. Just copy and
paste it into your terminal.
kubectl apply -f
https://raw.githubusercontent.com/tamilmaran-7/cilium-example/main/modified.yaml

Now let us get inside the pod and we will try to connect.

Here the policy is created, But we are not able to connect to the pod. If
you look at the policy we can see instead of ubuntu pod we are directly
giving its IP address. But this should not be the case and it won’t work. So
instead of this policy, we can follow the steps we have used in example 1 to
check for the pod to pod connection.
Example 2: DNS-egress allow only match names:
Create a Test Pod:
To test the sample cilium policy you need to deploy a test pod, just copy
and apply the following commands.
kubectl apply -f
https://raw.githubusercontent.com/tamilmaran-7/cilium-example/main/ciliumpodtest.yaml

You can see the testpod is running successfully and you can verify on
your own cluster using the same command. Now let us see one example
-> kubectl get pods
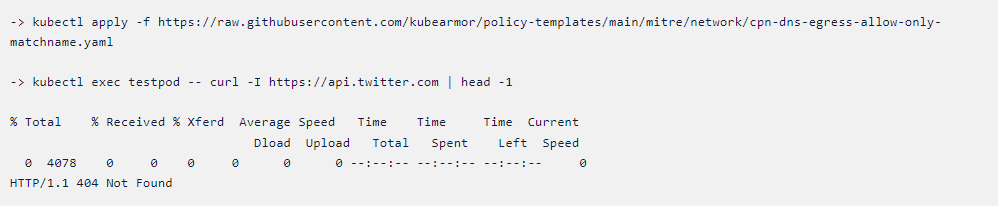
Let’s take this example to access the particular subdomain of twitter. In
this case, we’re trying to access api.twitter.com. usage of this policy is
only known domains can be accessed. This can be the fix for phishing attacks
Scenario1:
Let us see what results we get without applying the policy. Instead of
api.twitter.com, we can use mail.google.com.

Scenario2:
Now let’s apply the policy and see the difference in execution.
Difference between two scenarios:
In the first scenario, say you have an organization, we are able to access
any subdomains but after applying the policy we are only able to access the
particular subdomain. It means you are only able to access the
api.twitter.com.
Now let us try to access another subdomain in Twitter say help.twitter.com.
Just copy the following command.
-> kubectl exec testpod — curl -I –max-time 5 https://help.twitter.com
| head -1
Here it says ( connection timed out ) since in our policy we only
mentioned a particular subdomain.
Conclusion
This blog will provide knowledge about how the connection works between pods
and how we can restrict it; misconfiguration can happen without the proper
knowledge of the techniques.
To know more about the KubeArmor security policies, please check out the
Policy-Templates and the KubeArmor GitHub.
Now you can protect your workloads in minutes using AccuKnox, it is available to protect your Kubernetes and other cloud workloads
using Kernel Native Primitives such as AppArmor, SELinux, and eBPF.
Let us know if you are seeking additional guidance in planning your
cloud security program.
Must read articles
- Zero Trust (ZT) – The Future of Cloud Security
- Zero Trust (ZT) Architecture, Framework and Model
- Cloud Security Governance, Risk and Compliance (GRC)
- How to Pick the Right CNAPP (Cloud Native Application Protection Platform) Vendor
- What is Driving the Need for CSPM (Cloud Security Posture Management)
- Agent vs Agentless Multi Cloud Security
Zero Day Attacks cost $3.9M on average

4+
Marketplace Listings
7+
Regions
33+
Compliance Coverage
37+
Integrations Support

Stop attacks before they happen!
According to the latest IBM cloud attack report - Each cloud attack on an average costs $3.92M
Total Exposed Attacks in 2024 Costed